

Fast Hyperlinks
Backups are a kind of issues that everybody is aware of is important, plans to make, however normally don’t be concerned about till it’s too late. Here’s a fast, simple option to make a transportable backup resolution which you can hook up with any PC you need.
Making My Personal Transportable Backup Resolution
Throwing collectively your personal transportable backup is definitely extraordinarily simple; you actually solely want 4 issues.
- A spare SSD. It could possibly be NVMe or SATA.
- An exterior SSD enclosure
- A USB Cable
- A little bit of time to configure the drive the way you prefer it
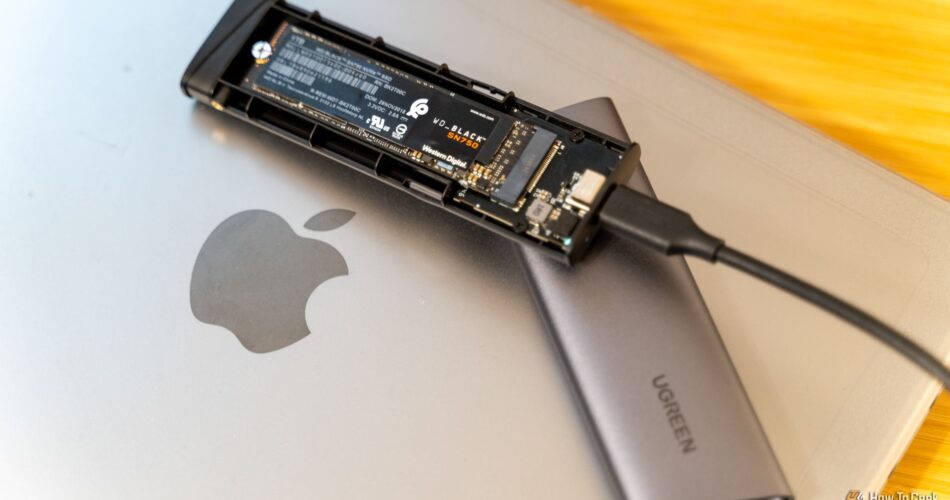
I had a spare NVMe SSD mendacity round (a Western Digital’s SN850x) and loads of USB-C cables. All I wanted to do was decide an enclosure that permit’s the SSD hook up with my PC by means of a USB port. Finally, I settled on an enclosure from UGREEN that has a most switch fee of 10Gbps.
On the time, that was the pace of the quickest USB-C Port on my PC, so it did not make sense to spend additional on pace I could not use.
All I needed to do was format the drive and plug it in, then use whichever backup software program was proper. On Linux, I take advantage of rsync; on Home windows, I take advantage of Robocopy.
Select Your SSD
In the event you’re making your personal exterior backup, the very first thing you must do is get an precise SSD if you do not have one.
You possibly can use a SATA SSD or an NVMe SSD, however I’d recommend buying an NVMe SSD when you’re shopping for new—the price of NVMe drives is about the identical as SATA drives nowadays, they usually’re a lot sooner and extra compact.
The large factor to concentrate to is their pace.
The learn and write speeds of drives are normally expressed in gigabytes per second (GB/s), whereas information switch charges are normally expressed by way of gigabits per second (Gb/s or Gbps—the lowercase b is the essential half). There are 8 bits per byte, so any time you see a learn or write pace given in gigabytes per second, you possibly can simply multiply by 8 to get your switch pace in gigabits per second.
NVMe drives usually hook up with your PC utilizing the PCIe interface, which implies they’re extraordinarily quick. Even PCIe 3.0 NVMe drives can have information charges above 3 GB/s (or 24 Gbps), PCIe 4.0 drives can attain a bit over 7GB/s (56 Gbps), and PCIe 5.0 drives often exceed 13GB/s (104 Gbps).
In follow, meaning you are virtually undoubtedly going to be restricted by the pace of the USB or Thunderbolt port in your PC reasonably than the pace of your drive. USB 3.2 2×2 has a most pace of 20 Gbps, USB 4 and Thunderbolt 4 have a most pace of 40Gbps, and Thunderbolt 5 and USB 4 v2 have most speeds of 80Gbps beneath regular circumstances.

Associated
Thunderbolt 5: What Is It, and How Much Faster Is It?
Extra energy, extra pace, and extra potentialities.
That implies that even probably the most sluggish PCIe 5.0 drives are going to be manner sooner than even probably the most cutting-edge USB-C ports in your PC, and there’s no level in spending prime greenback for additional pace you possibly can’t use. PCIe 5.0 drives additionally run extraordinarily scorching and generally even require energetic cooling, which provides price and complexity to your drive enclosure.
Stick with PCIe 4.0 drives. I have been utilizing an SN850x I picked up on sale and have been very happy with its efficiency.
Select Your SSD Enclosure
When you pick your SSD, you must decide an enclosure.

Why I Built My External SSD Instead of Buying a Premade One
Constructing your SSD is straightforward, enjoyable, and might be low-cost too!
Similar to with the SSD itself, you need to solely purchase an enclosure that matches what you are truly going to make use of. On the time I threw my enclosure collectively, the quickest USB port on my PC topped out at 10Gbps, so I bought a 10Gps enclosure.
You possibly can seek the advice of your motherboard guide to determine what the quickest port in your PC is, however when you do, here’s a small chart exhibiting what enclosure pace is value shopping for in case you have any given port.
A crimson X signifies that the port in query will not be capable to deal with the pace of the enclosure, and that you need to contemplate shopping for one thing else. A inexperienced and white test signifies that the port is at the very least as quick because the enclosure.
|
USB 3.2 1×1 |
USB 3.2 2×1 / USB 3.2 1×2 |
USB 3.2 2×2 |
USB 4 / Thunderbolt 4 |
USB 4 v2 / Thunderbolt 5 |
|
|---|---|---|---|---|---|
|
Enclosure Velocity 5Gbps |
✅ |
✅ |
✅ |
✅ |
✅ |
|
Enclosure Velocity 10Gbps |
❌ |
✅ |
✅ |
✅ |
✅ |
|
Enclosure Velocity 20Gbps |
❌ |
❌ |
✅ |
✅ |
✅ |
|
Enclosure Velocity 40Gbps |
❌ |
❌ |
❌ |
✅ |
✅ |
|
Enclosure Velocity 80Gbps |
❌ |
❌ |
❌ |
❌ |
✅ |
Put Every thing Collectively
Upon getting your enclosure and SSD in hand, all you must do is put them collectively. Often you do not want any instruments for this, however it’s possible you’ll want a small screwdriver.
In my case, it was so simple as sliding open the enclosure, slotting within the SSD, turning the small silicone retainer to carry the drive in place, after which closing it again up once more.
Setting Up Your Backups
As soon as you’ve got bodily assembled the drive and the enclosure, the one factor left to do is format the drive.

Associated
How to Format a Hard Drive or SSD on Windows 11
Wipe and put together your drive for an thrilling life of information storage adventures.
I will be shifting the drive between a Home windows desktop PC and a Linux laptop computer, so I opted to format the drive as exFAT, which is appropriate with all main working techniques. If you are going to solely use the drive on Home windows PCs, you need to in all probability use NTFS as a substitute.
I do not care an excessive amount of about backing up my working system settings, so I simply set up rsync on my laptop to back up a few important folders, and I configured robocopy to back up my files on Windows 11.
In the event you do wish to create restore factors on your working techniques, you may must create two separate partitions in your transportable SSD. One can be formatted as NTFS and can be used to save lots of Home windows 11 restore factors, and the opposite must be ext4, to be able to use Timeshift on Linux.
Bear in mind, SSDs do not fare properly in the event that they’re left unpowered for a protracted time period. You run an actual threat of shedding information.
In the event you’re trying to retailer data for longer, a mechanical exhausting drive saved in a cool, dry place might be safer. And if you need actually long-term backups, then I would recommend printing bodily copies and storing them someplace protected.
Source link