

Retaining your information synced throughout a number of units is among the largest challenges of utilizing a number of units. Positive, you may add your information to cloud storage companies so it is accessible from any of your units. However this comfort comes on the danger of privateness.
Equally, you possibly can create your own cloud storage using Nextcloud to maintain your information accessible throughout all of your units whereas retaining full management of it. Nonetheless, it takes effort and time, and also you want devoted {hardware} to self-host Nextcloud. Moreover, it might be overkill if you wish to preserve only a handful of recordsdata synced.
That is the place Syncthing comes into play. I have been utilizing Syncthing for some time to maintain recordsdata synced throughout a few of my units with out the cloud, and I am loving it.
What’s Syncthing, and the way does it work?
Understanding Syncthing’s peer-to-peer syncing

Syncthing is a peer-to-peer file syncing app that permits you to sync recordsdata throughout a number of units with out counting on a central server or third-party cloud service. You should use it for syncing paperwork, pictures, movies, and different varieties of information. All of the transfers occur over an encrypted channel, guaranteeing privateness and safety.
Syncthing works by scanning all of the recordsdata in a folder and breaking them into small blocks. Then, at any time when there is a change in a file, it solely sends the modified blocks to different units, saving each time and information. If a file is modified on a number of units concurrently, Syncthing retains each variations and renames the conflicting file to stop information loss.
For Syncthing to sync recordsdata, the units should be powered on, and the app should be operating. If a tool is turned off or disconnected, Syncthing pauses syncing on that machine; adjustments are constantly tracked on different units. When the machine turns again on and Syncthing begins once more, all queued adjustments are synced mechanically.
Why I take advantage of Syncthing over different companies
Key options that make it stand out

I’ve lengthy relied on Google Drive and Dropbox to maintain my necessary paperwork and different important recordsdata accessible throughout all my units. That’s, till I turned my broken laptop into a home server and went on a spree to discover numerous self-hosted apps.
Certainly one of these apps was Nexcloud, a service that permits you to arrange your individual cloud storage, providing you with full management over your information. I rapidly moved all my information to Nextcloud and arrange my household’s and my very own units to entry it. Nonetheless, I quickly realized that Nextcloud is not perfect after I wish to preserve just some recordsdata synced throughout units.
That is after I determined to provide peer-to-peer file syncing apps a shot. Of the few I attempted, Syncthing stood out to me as a result of it is open supply and presents all of the important options I would like—battle detection and dealing with, model management, and the power to sync folders independently throughout units—without spending a dime. I rapidly moved my continuously wanted recordsdata to it. In contrast to Nextcloud, Syncthing presents easy and quick peer-to-peer file syncing, making it perfect for my use case.
Because of it, I may also sync a bunch of labor and private challenge folders between my Mac and Home windows/Linux laptop computer and entry them whatever the machine I am utilizing. This protects me the effort of regularly sending recordsdata between units utilizing file-sharing apps like LocalSend or accessing/downloading them from my Nextcloud server.
Organising and utilizing Syncthing
Arrange as soon as, sync effortlessly eternally
Setting up your own sync system with Syncthing entails a number of steps. You may get Syncthing operating between a number of computer systems, a number of telephones, or a mixture of each, as required.
Set up and fundamental setup
Begin by downloading and putting in the Syncthing app on the units on which you wish to preserve your recordsdata synced. Syncthing is accessible on all main desktop platforms, together with Linux, macOS, and Home windows. Sadly, there is no official Syncthing app for Android and iPhone, so you may want to make use of their forks or third-party apps. Syncthing-Fork and Synctrain are common choices for Android and iPhone, respectively.
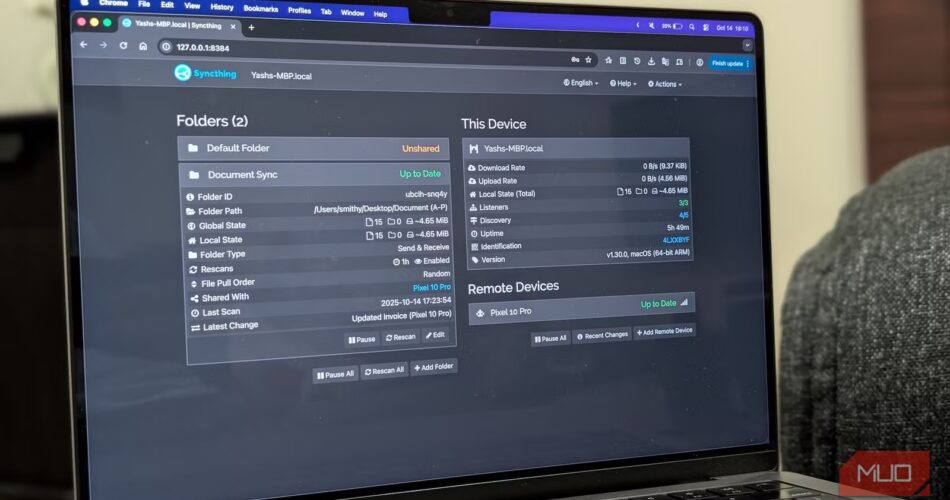
Open the Syncthing app in your pc. It’s going to generate the required configuration recordsdata and a novel machine ID, and in addition begin an area net server. You may entry it in your pc by heading to http://localhost:8284 in an online browser.

Right here, you may be prompted to arrange a username and password to stop unauthorized entry to the Syncthing net interface.
- Hit Settings to open the GUI settings. Alternatively, click on Actions, select Settings, and go to the GUI tab.
-
Kind a username and password within the GUI Authentication Consumer and GUI Authentication Password fields, respectively, and hit Save.
- It’s also possible to allow the Use HTTPS for GUI choice for improved safety.
- Moreover, you may set a memorable identify for the machine to make managing and monitoring units simpler. Go to Syncthing settings within the net interface. On the Normal tab, click on on the System Title textual content area and sort your most well-liked identify.
- Hit Save to avoid wasting the change.
Lastly, it’s essential to add Syncthing to your pc’s startup applications record. This fashion, Syncthing can be mechanically up and operating as quickly as your pc boots, so that you need not launch it manually. Adding an app to your Mac’s startup list is easy. On Home windows and Linux PCs, you may search for the steps in your working system.
Including units

With the essential setup full, the subsequent step is to hyperlink the units you wish to sync recordsdata between. To do that on a desktop:
- Entry the Syncthing net GUI, click on Actions within the top-right nook, and choose Present ID. For those who’re on a cell machine, faucet the three-dot menu within the top-left nook and select Present machine ID.
- Then, on one other machine, click on Add Distant System within the bottom-right nook of the web page, kind the machine ID for the primary machine, and hit Save. For those who’re on a telephone, go to the Gadgets tab, faucet the brand new machine icon (with the + button) within the top-right nook, and populate the fields.
It’s also possible to kind the machine identify within the System Title area to indicate it instead of the machine ID within the cluster standing. Alternatively, you may present the QR code on one machine and scan it utilizing the opposite to ascertain a connection.
After you do that, you may see a notification on the primary machine, prompting you concerning the connection request. Faucet the verify mark to simply accept and connect with the second machine. You may see the Linked standing subsequent to the linked machine on each the net interface and the cell app.
Including folders to sync

After you’ve got linked the units, it is time to add the folders you wish to sync.
- Head to the Syncthing net GUI and hit the Add Folder button. Right here, give a descriptive label for the folder within the Folder Label textual content area.
- Then, kind the trail to the folder in your pc that you simply wish to sync. You might even see a immediate requesting entry to the folder. Grant it permission.
- Change to the Sharing tab. Below Unshared Gadgets, tick the checkbox subsequent to the machine you simply added and hit Save. You may see a notification on the opposite units, asking if you wish to add the shared folder.
- Hit Add to proceed.
You may now want so as to add a label and enter the trail to the folder the place you need the synced recordsdata saved. Lastly, hit Save.
Syncing recordsdata
Now that you have configured all the things, everytime you create, modify, or delete recordsdata or subfolders contained in the synced folder on any of your synced units, the adjustments are synced throughout all of them. This occurs mechanically and in real-time, with none intervention.
Organising file versioning
By default, Syncthing does not use file versioning, which means it does not retailer outdated variations when recordsdata are deleted or changed from different units. Nonetheless, in case you’re utilizing Syncthing to sync recordsdata that change continuously, it is best to arrange file versioning to keep away from dropping information as a consequence of unintended adjustments.
Syncthing presents a number of file versioning choices. Its net GUI has a Assist button that takes you to a weblog explaining every choice and its use case intimately. However typically talking, the staggered file versioning system is taken into account the best choice for most individuals. It strikes the best steadiness between retaining helpful model historical past and managing cupboard space by conserving a number of variations spaced out over time—extra new variations and fewer outdated variations—and mechanically pruning outdated variations.

To do that, click on the folder in sync and hit Edit. Go to the File Versioning tab, click on the drop-down, and choose an applicable choice. Hit Save.
Different instruments use the identical idea, too
There are various Syncthing alternate options accessible that additionally present peer-to-peer, decentralized file syncing. In style choices embrace Resilio Sync, Librevault, and Rclone, with Resilio Sync being essentially the most extensively most well-liked as a consequence of its efficiency and ease of use. Selecting the best software boils right down to your syncing wants, platforms you utilize, and different function necessities.
Source link