

A) Particulars – high
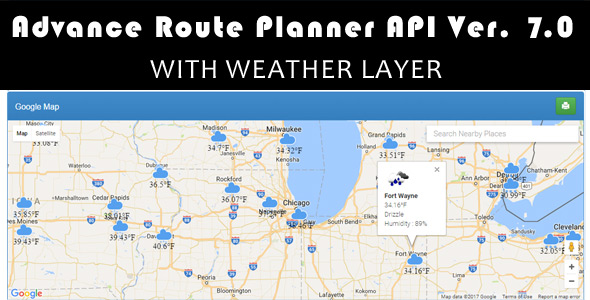
Advance Route Planner is a A to B RoutePlanner software written in Pure Javascript with Google Map Ver. 3 API. it have very advance options like :
1) Added Climate layer on Google Map with OpenWeather APi
2) Added Transit Calculator
3) Added Place Search in all location textboxes.
4) Mounted Bugs.
5) Gasoline Calculator.
6) Sorting of Areas.
7) Added Assist Part.
") Distance Unit Choice Added.
Distance Unit Choice Added.
9) Optimized CSS, JS to reduce web page load.
10) Site visitors Layer Added.
11) Search Field for Close by Location.
12) Auto Location Detection.
13) Added Google Close by Locations.
14) Now you may add a number of Waypoints
15) Get Shortest Route from A number of Waypoints
16) Get Journey / Tour Value by Value Calculator
17) Convert KM to Miles simply
18) Responsiveness.
19) Google Adsense.
20) Drag-able Route, modify route as per your requirement.
21) Share ready Hyperlink Generator.
22) Print button.
23) Change Google Map Language.
24) Repair your beginning / ending level with ease and get correct Route Instructions in particulars through Google API.
This software may be simply connected to any current Tasks.
when you have any question you may contact us any time at my profile page or raise ticket.
") The way to Use – high
The way to Use – high
Extract all of the recordsdata kind the zip. The file you could embody Google API Javascript together with routeplannerapi.js.
In the event you wished to put in the plugin in your web site please observe beneath after establishing above settings
embody beneath libraries
<script src="https://maps.googleapis.com/maps/api/js?v=3.exp"></script>
<script sort="textual content/javascript" src="https://maps.googleapis.com/maps/api/js?libraries=adsense"></script>
<script src="js/routeplannerapi.min.js"></script>
Arrange Type, to get Beginning and Ending Location and name calcRoute(); operate on button submit as beneath :
<kind class="form-inline" function="kind">

<div class="form-group">
<label class="sr-only" for="begin">Beginning Location :</label>
<enter sort="textual content" class="form-control" id="begin" placeholder="Enter Beginning Location">
</div>

<div class="form-group">
<label class="sr-only" for="finish">Vacation spot Location :</label>
<enter sort="textual content" class="form-control" id="finish" placeholder="Enter Vacation spot Location">
</div>

<div class="form-group">
<choose class="form-control" id="mode" identify="mode">
<possibility worth="DRIVING">Driving</possibility>
<possibility worth="WALKING">Strolling</possibility>
<possibility worth="BICYCLING">Bicycling</possibility>
<possibility worth="TRANSIT">Transit</possibility>
</choose>
</div>

<button sort="button" class="btn btn-success" onClick="calcRoute();">Get Route</button>
</kind>
Add Google Map Div and Google Route Div within the Web page as beneath
<div id="map-canvas" />
<div id="directionsPanel" />
Thats it ! you’re good to go if you wish to do any modifications please observe beneath directions :
var _ZNRPL = {
latitude : 41.850033,
longitude : -87.6500523,
begin:"",
finish:"",
adsense:true,
publisherid:"ca-google-maps_apidocs",
adformat : "BANNER",
adposition : "RIGHT_BOTTOM",
adbackgroundColor: '#c4d4f3',
adborderColor: '#e5ecf9',
adtitleColor: '#0000cc',
adtextColor: '#000000',
adurlColor: '#009900'
};
You may set the variables, as per your requirement like beneath :
You may set your middle location when web page load by offering latitude and longitude of your location.
latitude : 41.850033,
longitude : -87.6500523,
You may setup your beginning or ending location as beneath
begin:"Chicago",
finish : "New York",
You may allow or disable Google Adsense as beneath
adsense:true,
If adsense is allow you need to set your writer id as beneath
publisherid:"ca-google-maps_apidocs",
If adsense is allow you need to set Kind of Banner Format as beneath
adformat : "BANNER",
As per Google Adsense, Banner Format may be :
LEADERBOARDcreates a completely horizontal show space.BANNERcreates a horizontal “banner” advert.HALF_BANNERcreates a smaller horizontal “banner” advert.SKYSCRAPERcreates a big vertical advert.WIDE_SKYSCRAPERcreates a large vertical advert utilizing bigger
sort.VERTICAL_BANNERcreates a medium-sized vertical advert.BUTTONcreates a small advert.SMALL_SQUAREcreates a barely bigger sq. advert.SQUAREcreates a big sq. advert with giant sort.SMALL_RECTANGLEcreates a small rectangular advert.MEDIUM_RECTANGLEcreates a medium rectangular advert.LARGE_RECTANGLEcreates a big rectangular advert.SMALL_VERTICAL_LINK_UNITcreates a small vertical hyperlink
unit.MEDIUM_VERTICAL_LINK_UNITcreates a medium vertical hyperlink
unit.LARGE_VERTICAL_LINK_UNITcreates a big vertical hyperlink
unit.X_LARGE_VERTICAL_LINK_UNITcreates an additional giant vertical
hyperlink unit.SMALL_HORIZONTAL_LINK_UNITcreates a small horizontal hyperlink
unit.LARGE_HORIZONTAL_LINK_UNITcreates a big horizontal hyperlink
unit.
If adsense is allow you need to set Place of Banner as beneath
adposition : "RIGHT_BOTTOM",
As per Google Adsense, Banner Place may be :
TOP_CENTERsignifies that the adunit ought to be positioned
alongside the highest middle of the map.TOP_LEFTsignifies that the adunit ought to be positioned alongside
the highest left of the map, with any sub-elements of the management “flowing”
in direction of the highest middle.TOP_RIGHTsignifies that the adunit ought to be positioned alongside
the highest proper of the map, with any sub-elements of the management “flowing”
in direction of the highest middle.LEFT_TOPsignifies that the adunit ought to be positioned alongside
the highest left of the map, however beneath anyTOP_LEFTcomponents.RIGHT_TOPsignifies that the adunit ought to be positioned alongside
the highest proper of the map, however beneath anyTOP_RIGHT
components.LEFT_CENTERsignifies that the adunit ought to be positioned
alongside the left aspect of the map, centered between theTOP_LEFT
andBOTTOM_LEFTpositions.RIGHT_CENTERsignifies that the adunit ought to be positioned
alongside the correct aspect of the map, centered between the
TOP_RIGHTandBOTTOM_RIGHTpositions.LEFT_BOTTOMsignifies that the adunit ought to be positioned
alongside the underside left of the map, however above anyBOTTOM_LEFT
components.RIGHT_BOTTOMsignifies that the adunit ought to be positioned
alongside the underside proper of the map, however above anyBOTTOM_RIGHT
components.BOTTOM_CENTERsignifies that the adunit ought to be positioned
alongside the underside middle of the map.BOTTOM_LEFTsignifies that the adunit ought to be positioned
alongside the underside left of the map, with any sub-elements of the management
“flowing” in direction of the underside middle.BOTTOM_RIGHTsignifies that the adunit ought to be positioned
alongside the underside proper of the map, with any sub-elements of the management
“flowing” in direction of the underside middle.
If adsense is allow you need to set Colours Scheme of Banner as beneath in hex format
adbackgroundColor: '#c4d4f3',
adborderColor: '#e5ecf9',
adtitleColor: '#0000cc',
adtextColor: '#000000',
adurlColor: '#009900'