![]()
![]()
![]()
![]()
You might be promoting your merchandise in your bodily retail retailer, you wish to provide your merchandise on any fashionable
internet browser, after which handle merchandise, orders, and clients seamlessly, promoting primarily based on the Level of Sale
interface shall be a disregard alternative.
WebPOS – Level of Sale for WooCommerce is a useful software for putting orders on the retailer utilizing the WebPOS
interface. WebPOS – Level of Sale for WooCommerce helps systematize product info (product varieties, worth,
inventory, barcode…) and handle your merchandise, orders, and clients seamlessly via the synchronization system.
WebPOS – Level of Sale for WooCommerce guarantees to convey an enormous benefit for store retailers, food and drinks,
and extra…


Plugin’s options
Place order on the POS system
- Proceed with a number of payments for a number of clients without delay.
- Help shortcuts that assist the cashier to control shortly.
- Help for all sorts of barcode scanners.
- Add merchandise by Barcode Scanning or search by title or SKU or barcode
- Help easy and variable merchandise.
- Add customized merchandise.
- Change product amount.
- Swap amongst variations of a specific variable product on the cart.
- Add/take away objects within the cart.
- Change the merchandise worth.
- Order word/ merchandise word.
- Search clients by title, e mail, and telephone quantity and assign the client for the present order.
- Add new clients and assign the client to the invoice
- Add/take away cart low cost (Proportion or fastened quantity) and WooCommerce current coupon.
- Set most utilized coupons for orders on the backend.
- The Settings structure choices can help you select which elements on the POS web page shall be hidden or proven. There
are 8 choices so that you can toggle an element to look or cover: Delivery info, Cart subtotal subject, Tax
subject, Steered quantity, Order variety of cart objects, Cart merchandise inventory, Cart merchandise worth, and Cart merchandise
subtotal.
Help Progressive Net Apps
- Working with offline mode utilizing the Progressive Net Apps.
- Routinely sync the offline orders to on-line.
Cost on the POS system
- Permit clients to make use of multiple fee technique to pay for a similar order.
- Management checkout fee strategies, and take a look at with default or prolonged WooCommerce gateways.
- Print order receipts routinely after checkout.
Order and buyer administration
- View the POS orders, and replace or refund the orders on the POS web page.
- Print the receipt for every order.
- Set a hard and fast standing for the orders created from WooCommerce POS.
- Ship order emails to clients.
- Show the POS order receipt in WooCommerce order emails.
- Management the order statuses that the cashier can edit.
- View, add, and edit clients on the POS web page.
As we speak’s transaction
- Observe a listing of transactions created at this time.
- Add new transactions.
- The search field to seek out at this time’s transaction. Search a transaction by Transaction ID, Order ID, Cost
Methodology, or Be aware. - Transaction info contains Transaction ID, Order ID, Money influx, Money outflow, Cost technique,
Transaction word, and date.
Barcode administration
- Common settings for the product barcode.
- Design the product barcode.
- Print preview.
- Print the product barcode. Print the barcode for a person product, some chosen merchandise, or all
merchandise.
Receipt administration
- Help a number of receipts
- Settings for customizing the receipt structure and contents.
- Settings for the order merchandise particulars and the order whole part of the receipt.
- Receipt print preview.
Report
- Report the POS transaction historical past and make statistics within the reviews part. This report part will give
you a panic image of income figured at a sure time. - The reviews give details about cashiers, outlet or fee statistics, and the order whole they earn on
a spread of sure days. - Print Report
A number of shops
- Help outlet’s level of sale for Eating places/Groceries
- Straightforward to change amongst shops on the POS entrance finish
- Handle shops: Add/edit/take away shops.
- Handle outlet shares: Add and alter the shares for every outlet for each easy and variable merchandise.
- Handle outlet’s info: Title, cashiers, receipt shops, outlet’s handle, telephone, and mail.
- Help tables for eating places and cafes:
- Add limitless tables
- Clone desk, duplicate the above desk row
- Change the desk standing, allow or disable
- Title for the desk
- Assign the variety of desk seats
- Add a desk description
- Take away tables
- Pleasant interface to handle desk statuses: Accessible, Busy, Disable.
Further options
- Add a customized endpoint within the POS web page URL.
- Settle for to run POS system restricted on some belief IPs utilizing the Whitelist IP characteristic.
- Routinely replace the POS web page with on-line knowledge every time.
- Help RTL and responsiveness.
- Help RTL for receipt.
- Sequential bill quantity.
- Choices to set required/optionally available fields when including a brand new buyer
- Add transport info for POS orders
- Tax calculation primarily based on an handle: Store base handle, outlet handle, order transport handle, buyer
billing handle, or buyer transport handle. - Customized CSS for Receipt
Element options
General Configuration
Merchandise
- Use SKU as a substitute of barcode: The product barcode shall be routinely assigned because the
product SKU, so you’ll not must enter a price for the barcode. - Use product meta as a substitute of barcode: Override the product barcode with one other subject by
getting into the meta subject key. Depart clean to not set. - Permit the cashier so as to add customized merchandise to the cart: In case, new merchandise haven’t
been up to date within the retailer, cashiers can add new customized merchandise to the cart. - Permit the cashier to replace variations to the cart: The cashier can alter a brand new variation
for the chosen variation. - Permit the cashier to alter the product worth: The cashier can replace the product worth
immediately on the POS web page if she is allowed. - The cashier can change the product worth: Decide which cashiers have entry to replace
the product worth on the POS web page.
Orders
- Sequential bill numbering: You should utilize a customized order quantity to print receipts in
sequential order. This feature is simply relevant to the brand new order. - Set most utilized coupons: Coupons could be utilized on POS orders. You possibly can restrict the
variety of coupons that may be utilized per order. - Set a hard and fast standing for the orders created from WooCommerce POS: You possibly can assign a hard and fast
order standing for the orders created from WooCommerce POS. - WooCommerce emails created by the POS orders are despatched to: You possibly can select to ship to admin
solely, the client, by Woo default or not ship. - Present receipt within the e mail: Permit the show of the POS order receipt in WooCommerce e mail
orders. To make use of this characteristic, you will need to set up the WooCommerce E mail Template Customizer plugin. - Replace the orders on the WooCommerce POS web page by the cashier: Within the order administration
part of the WooCommerce POS web page, you’ll be able to permit the cashier to replace the order by choosing which order
statuses are acceptable to replace. - The cashier can replace orders: Assign the cashiers who’re allowed to replace the orders.
- Order standing can edit: The standing of POS orders that the cashier can change.
- Order search fields: Choose fields used to look an current POS order.
Clients
- Obligatory fields: Choose which fields are necessary when including a brand new buyer.
- Buyer search fields: Choose fields used to look and add an current buyer for the
POS order. - Replace the client’s info: The client info on the POS web page could be modified
by the cashiers when you permit it.
Funds
- Permit clients to pay in a number of fee strategies: Permit clients to make use of multiple
fee technique to pay for a similar order. - Cost: Choose fee strategies for WebPOS orders in out there WooCommerce fee strategies. Aside
from these fee strategies, Money will all the time be accepted on the POS retailer.
Configuring the Product Barcode
Every product shall be recognized by a barcode. Product barcodes are distinctive, they’re generated beneath sure
requirements reminiscent of Code 128, Code 38, EAN 13, and UPC. Within the Product Barcode part, you’ll be able to configure choices
on how the product barcode is displayed, and the print barcode operate.
- Print the barcode operate and preview the barcode look.
- Design the barcode beneath a sure commonplace: Code 128, Code 38, EAN 13, UPC, customise the barcode’s structure
and magnificence, and a customized CSS part to design the barcode personally.
After the designed barcodes of the merchandise are printed out, you’ll label them on every product. The cashier
will sweep the barcode on the merchandise with a barcode scanner to make WooCommerce POS transactions.
Configuring the receipt template
Within the Receipt part of the plugin, you’ll be able to create as many receipt templates as you need and customise them.
There are numerous settings to configure the receipt structure and contents. You possibly can preview the receipt and print it
as a pattern.
a. Common info on the receipt
- Route: Help Left to Proper and Proper to Left.
- Emblem: Add a emblem to the receipt if you must, select a picture out of your gallery.
- Emblem place: Set the place for the emblem icon on the receipt: Left, proper, or middle.
- Emblem width: Change the width of the emblem.
- The receipt web page width: Regulate the width of the receipt web page.
- The receipt web page margin: Regulate the margin of the receipt web page.
- Contact Data: Add your handle on the level of sale. You should utilize out there
shortcodes for the store’s contact info.{site_title}– Web site Title{address_1}– Handle line 1{address_2}– Handle line 2{metropolis}– Metropolis{state}– State{nation}– Nation
- Invoice Title: Title for the title of the receipt.
- Invoice title font measurement: Regulate the font measurement of the invoice title.
- Invoice font measurement: Change the font measurement of your complete invoice.
- Footer message: The message you permit on the footer of the receipt. You possibly can add shortcodes
on this footer space, and print the receipt footer together with the shortcode, which you should use
{order_id}
for the ID order parameter within the shortcode. - Order information column: Column the order information on the invoice, could be set to 1 or 2 columns
- Order date show: Allow to show of the order date on the receipt.
- Order date label: Change the order date label displayed on the receipt.
- Order ID show: Allow to show of the order ID info on the receipt.
- Order ID label: Change the order ID label displayed on the receipt.
- Cashier title show: Allow to show of the cashier’s title on the receipt.
- Cashier label: Change the cashier label displayed on the receipt.
- Buyer: Allow to show buyer’s title on the receipt.
- Buyer label: Change the client label show on the receipt.
- Buyer info: Choose buyer knowledge displayed on the receipt, it may be: E mail, Full
title, First title, or title, Firm, Firm or Full title. - Buyer telephone: Allow to show buyer’s telephone quantity on the receipt.
- Buyer telephone label: Change the client telephone quantity label displayed on the receipt.
- Buyer handle label: Change the client handle label displayed on the receipt.
- Buyer handle: Allow to show buyer’s handle on the receipt. You should utilize
out there shortcodes in regards to the buyer handle:{address_line_1}– Handle line 1{address_line_2}– Handle line 2{metropolis}– Metropolis{state}– State{nation}– Nation
- Customized CSS: Design the receipt as your need
b. Order merchandise particulars on the receipt
- Template of things subject: Select a mode of how the objects subject shows on the receipt.
They are often flat or block-style. - Allow product word: Allow to show of the product word on the receipt.
- Product ID: Allow to show of product ID on the receipt.
- Product worth: Allow to show of product worth on the receipt.
- Product worth label: Change the product worth label displayed on the receipt.
- Product Amount: Allow to show of product amount on the receipt.
- Product amount label: Change the product amount label displayed on the receipt.
- Product subtotal: Allow to show of product subtotal on the receipt.
- Product subtotal label: Change the product subtotal label displayed on the receipt.
- Product label: Change the column title on the receipt.
- Allow product variation: Allow or disable to show or cover the variations of the
variable product on the receipt. - Restrict in product title: The utmost variety of characters allowed within the product title.
c. Order whole on the receipt
- Allow order word: Allow to show of the order word on the receipt.
- Order whole tax: Allow to show of the order whole tax on the receipt.
- Complete tax label: Change the order whole tax label displayed on the receipt.
- Order transport: Allow to show of the order transport on the receipt.
- Delivery label: Change the transport label displayed on the receipt.
- Order coupon: That is an current WooCommerce coupon, enabling to show of this sort
of coupon on the receipt. - Coupon label: Change the coupon label displayed on the receipt.
- Order POS low cost: The sort of low cost is generated immediately for a POS order by the
plugin, enabling to show of the sort of low cost on the receipt. - POS low cost label: Change the POS low cost label displayed on the receipt.
- Show the paid: Allow to show the paid quantity of the client on the receipt.
- Paid label: Change the paid label displayed on the receipt.
- Show the change: Allow to show of the change on the receipt.
- Change label: Edit the change label displayed on the receipt
- Order whole: Allow to show of the order whole on the receipt.
- Order whole label: Change the order whole label displayed on the receipt.
Reports
WebPOS – WooCommerce POS – Level of Sale recorded the POS transaction historical past and made statistics within the reviews
part. This report part gives you a panic image of income discovered at this time, yesterday, 30 days, 90
days, a yr, or a sure time.
The reviews give details about cashier statistics and the order whole they earn in a spread of sure
days.
Point of sale on the WooCommerce POS page
WebPOS – Level of Sale for WooCommerce gives cashiers with the instruments they should create and handle orders,
transactions, and clients, setting structure.
a. Inserting orders on the WooCommerce POS web page:
If you go to a WooCommerce POS web page, you’ll be able to see a world POS web page interface shall be introduced with the
following purposeful areas.
- Keyboard shortcuts: Keyboard shortcuts are keys or mixtures of keys that present an
different technique to do one thing on the POS web page that you simply’d sometimes do with a mouse. Hovering the
Keyboard shortcut icon on the prime proper nook of the POS web page, you’ll be able to see the keyboard shortcut annotation
checklist.- F1: Add a brand new invoice
- F2: Add customized product
- F3: Add new buyer
- F4: Add low cost
- F6: Seek for product
- F7: Search buyer
- F8: Concentrate on buyer paid
- F9: Select fee technique
- F10: Checkout and Print
- ESC: Shut something
- Improve the variety of merchandise
- Lower the variety of merchandise
- Search merchandise: Discover merchandise on the search field so as to add to the cart, the cashier can search
for a product by title, SKU, or barcode. - Add merchandise to the cart: So as to add the merchandise which can be discovered to the purchasing cart, merely
click on on them. - Add customized merchandise: The cashier can add new customized merchandise to the cart if they aren’t
out there within the stock simply by clicking the plus button subsequent to the product search field. The cashier can
add the title, worth, and amount of the customized product. - Regulate product amount so as to add to the cart: The cashier can enhance, or lower the
variety of merchandise portions within the cart. - Change amongst variations on the cart: The cashier can change amongst variations of a specific
merchandise on the cart. - Take away merchandise: The cashier can take away every product from the cart.
- Take away all merchandise: The cashier can take away all merchandise from the cart.
- Add/take away product notes: The cashier can add and take away a word in every product merchandise.
- Add/take away order notes: The cashier can add and take away a word for every order.
- Search current clients: Discover current buyer info on the search field to assign
for the order, the cashier can search by the client title, e mail, and telephone quantity. - Add new clients: If a buyer is new, the cashier can create a brand new buyer and add new
buyer info (Together with First title; Final title; Emails; Cellphone; Handle; Nation; State; Metropolis;
Postcode/Zip code. - Show order particulars: The order particulars shall be displayed on the best aspect of the
WooCommerce POS web page and let the cashier know in regards to the order info together with subtotal, tax, coupon,
transport, must pay, paid, change. - Cost strategies: Record the fee strategies which can be out there to be used.
- Print the invoice/receipt after checkout: After testing for an order, the cashier can
select a receipt template and routinely print the client receipt.
b. Order administration
On the WooCommerce POS web page, the cashier can select and shortly verify all POS orders within the Order menu. On
the POS order web page, you’ll be able to:
- Observe a listing of POS orders that shall be displayed together with the order info. When clicking on every
order, the order merchandise element and order whole will show.- Order ID
- Order date and time
- Buyer info (Buyer’s title and e mail). If the client doesn’t depart their info,
set them as a visitor by default. - Order whole
- Variety of objects
- Order merchandise particulars
- The cashier can print the receipt on the POS order web page.
- Search order by order quantity, order whole, buyer e mail, buyer title
- The cashier might replace the order info and refund the order if she is allowed by the admin in WebPOS
> Orders: Permit the cashier to replace orders.
c. As we speak transaction visibility
On the WooCommerce POS web page, there’s a menu to verify all at this time’s transactions. On this POS at this time transaction
web page, you’ll be able to:
- Observe a listing of transactions created at this time.
- The search field to seek out at this time’s transaction. Search a transaction by Transaction ID, Order ID, Cost
Methodology, or Be aware. - Transaction info contains Transaction ID; Order ID; Money influx; Money outflow; Cost technique,
Transaction word, and date. - Add new transactions by clicking on the plus button.
d. Including and managing clients/customers
On the WooCommerce POS web page, the client’s menu permits the cashier to handle clients/customers who’re ordered
via the POS web page. On this POS buyer web page, you’ll be able to:
- Observe a listing of WooCommerce clients and customers. When clicking on a buyer, the client info
shall be displayed together with First title; Final title; E mail; Cellphone; Handle; Nation; State; Metropolis; and
Postcode. - Seek for an current buyer. The shortcut F7 is to seek for current clients.
- Add new or edit the purchasers’ and customers’ info.
e. Settings structure
You possibly can select which elements on the POS web page shall be hidden or proven within the Settings structure menu. There are 8
choices so that you can toggle an element to be appeared or hidden:
- Delivery info
- Cart subtotal subject
- Tax subject
- Steered quantity
- Order variety of cart objects
- Cart merchandise inventory
- Cart merchandise worth
- Cart merchandise subtotal
f. Retailers on frontend
- Select an outlet: After creating your shops, go to the front-end POS web page, the cashier
shall be requested which outlet they’ll promote at - Entry tables: With the restaurant, the cashier can handle tables on the entrance finish within the
Tables Menu or click on on the
icon
- Handle tables:
- The variety of tables: shall be decided by the variety of tables you created within the
backend - Desk statuses: The desk statuses could be: Accessible, Busy, Disable
- Order for a desk: The cashier will click on on a desk to order meals/drink for that
desk
- The variety of tables: shall be decided by the variety of tables you created within the

Managing Outlets in the Backend
You create and handle all shops of POS transactions. There are 2 varieties of shops (Groceries and Eating places),
so there shall be theme settings.
Managing WooCommerce POS transactions in the
backend.
As soon as orders are created on the WooCommerce POS web page, all transactions shall be saved on the Transaction web page in
the plugin backend. On this web page, you’ll be able to:
- Observe all transactions created by WooCommerce POS. Transaction info contains:
- Transaction ID
- Cashier
- Order ID
- Money influx
- Money outflow
- Cost technique
- Transaction word
- Transaction date and time.
- Filter the transactions by a cashier.
- Filter the transactions by date.
- Take away transactions
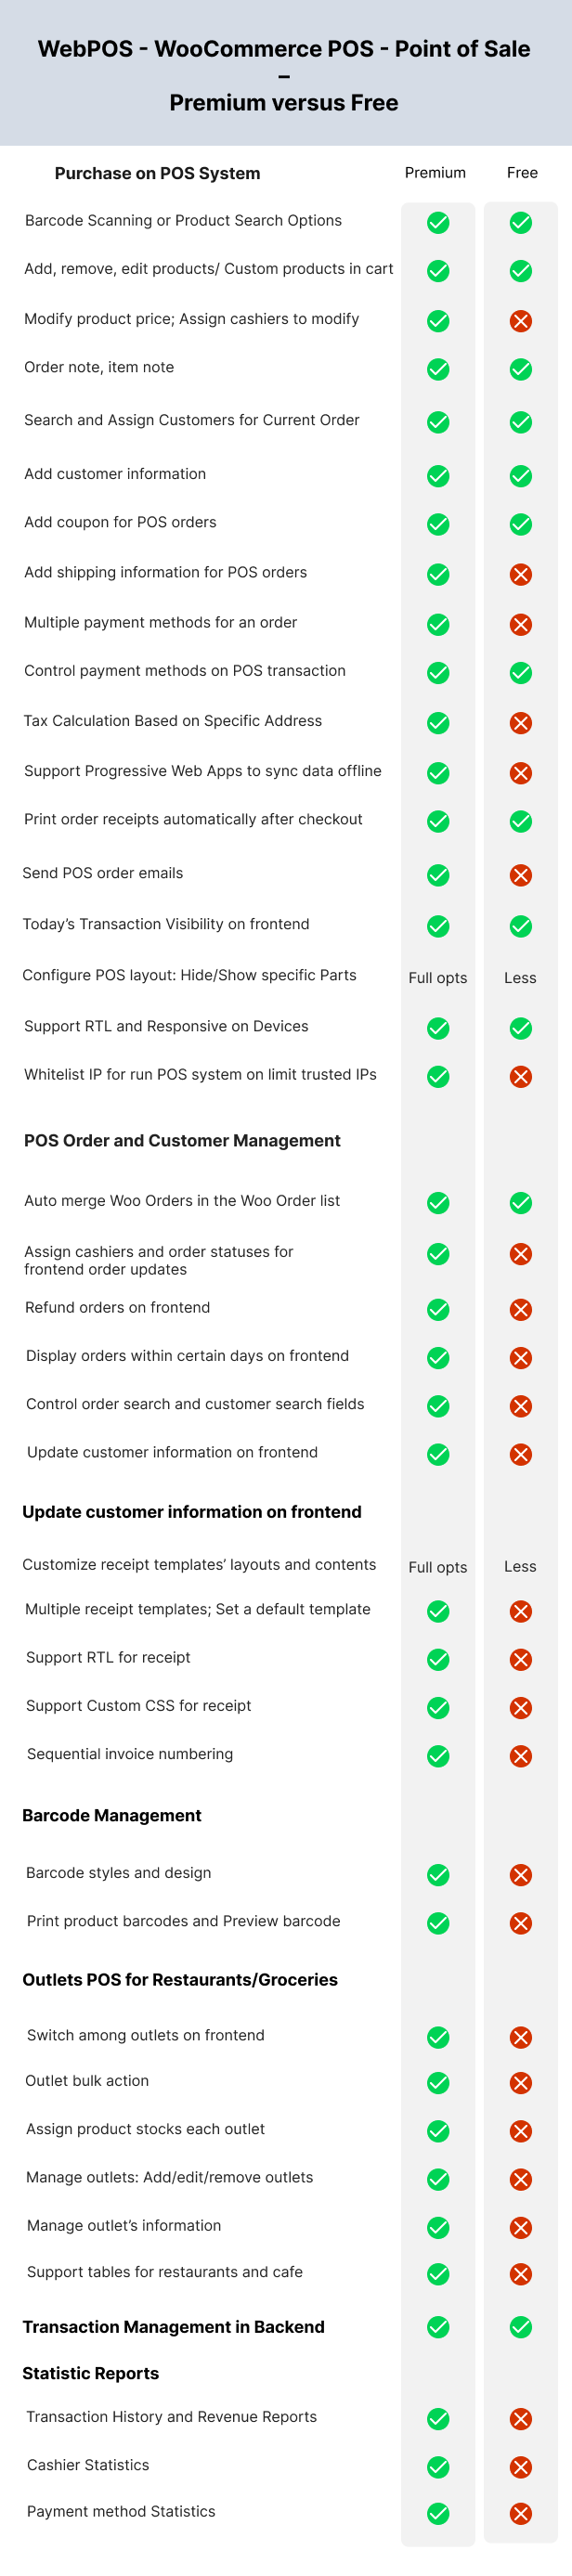
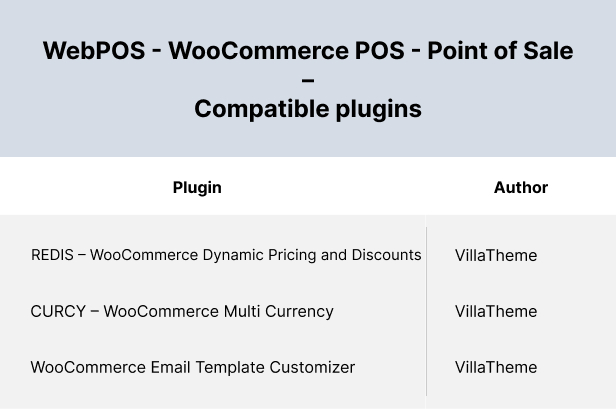
Compatibility
Comparability desk of the Free and Premium variations