WooCommerce product image size is a vital aspect of any online shop. Customers get a lot of intentional and unintentional messages from your site’s visual communication.
The quality and resolution of your images are critical as they can shape the perspective about the product. They’ll likely be the first and only contact customers have with the product before purchase.
Make a slight mistake, and the customer could bounce.
It’s thus important that store owners come up with creative ways of optimizing WooCommerce product images to drive sales and increase revenue.
One essential aspect of this is optimizing your WooCommerce product image size.
There are several ways of going about that, including:
- Adjusting the photo lighting
- Speeding image delivery using WooCommerce plugins
- Modifying image size
Let’s take a more in-depth look into this.
High resolution images with correct dimensions
Adding images in different sizes often leads to blurred or stretched images.
And guess what?
A big customer turn-off is unclear, grainy, blurred, or discolored images shot in poor lighting. It’s one of the biggest mistakes that can lead to poor sales.
You should add images in the correct dimensions for your online store because it boosts the quality of your image and might play a major role in driving conversions.
So, what is the best image size for WooCommerce?
What should be the exact size of an image?
The best image size for WooCommerce is dependent on several things, like:
- Store user interface
- The WooCommerce theme used
- The type of image zoom plugin the store uses
Typically, the minimum resolution you should aim for with your WooCommerce product images is 800px x 800px. The maximum recommended resolution should be no higher than 1000px x 1000px.
However, for better quality, you should aim as high as possible.
For example, the above dimensions are suitable for standard products, while complicated and detailed products might require larger images. Probably 2000 pixels and above, to allow customers to zoom in on even the more minor details.
Note how you can edit the dimensions of your product images in WooCommerce.

As you can see in the image above, there are several types of images for WooCommerce and each has its optimal size. These include:
Catalog images
These are usually medium-sized images that are suitable for exclusive product page loops. These include the likes of Related Products, Shop, and Product Category pages. These images are typically a few hundred pixels in dimensions.
For instance, note how the catalog images on Walmart are small, yet clear.

Single product images
This refers to main or featured photos. They are likely the largest images and are used when you’re creating a WooCommerce product listing.
The single product images shouldn’t be cropped and must have a minimum width of 600 pixels.
For instance, note how the below product image from Target is large.

Thumbnail image
This is a reduced-size version of a bigger image used as a placeholder for bigger images. Thumbnails are square, cropped, and suitable for product galleries, shopping carts, and widgets.
WooCommerce thumbnail sizes are set to 600 pixels width by default. However, the store owner can customize them depending on usage.
Similarly, gallery thumbnail size is set to 100 pixels x 100 pixels by default.
Take a look at these thumbnails from Etsy. They are small, yet clear enough to convince visitors to click on them to open the product pages.

Adjust the photo Level
Another way of achieving the best WooCommerce shop page image size is adjusting the photo Level using various image editing tools and programs.
All you need are platforms such as Adobe Lightroom, Photoshop, Affinity Photo, Procreate, or similar programs. Using these tools, you can easily adjust the lighting Levels of your images.
But what are Levels, after all?
Levels allow you to manipulate the histogram of your photo. You can adjust the mid-tone, light points, and dark points as you wish. Tuning the midpoints means you can remove excess image light, add contrast, and improve saturation.
Here’s an example of an image and its histogram.
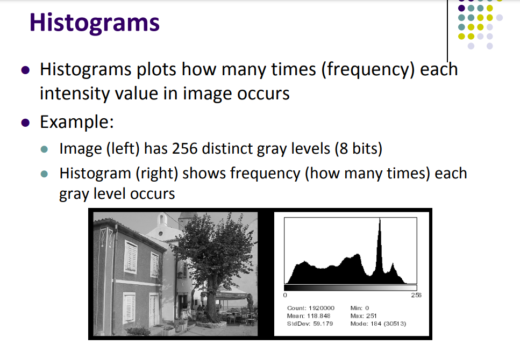
Don’t let these huge terms diminish your hope of adjusting photos for your WooCommerce gallery. You can perform all mentioned actions with basic image editing skills or hire someone to do it for you.
And if you’ve got limited access to premium photo-editing suites like Lightroom, search the internet for similar image editing tools like Adobe Spark or Pixlr.
A tip here—keep the image background as simple as possible while adjusting images for your WooCommerce product gallery. It’ll help your client see the image clearly as your product would be highlighted. Additionally, it lowers the amount of information in the photo, which reduces image file sizes.
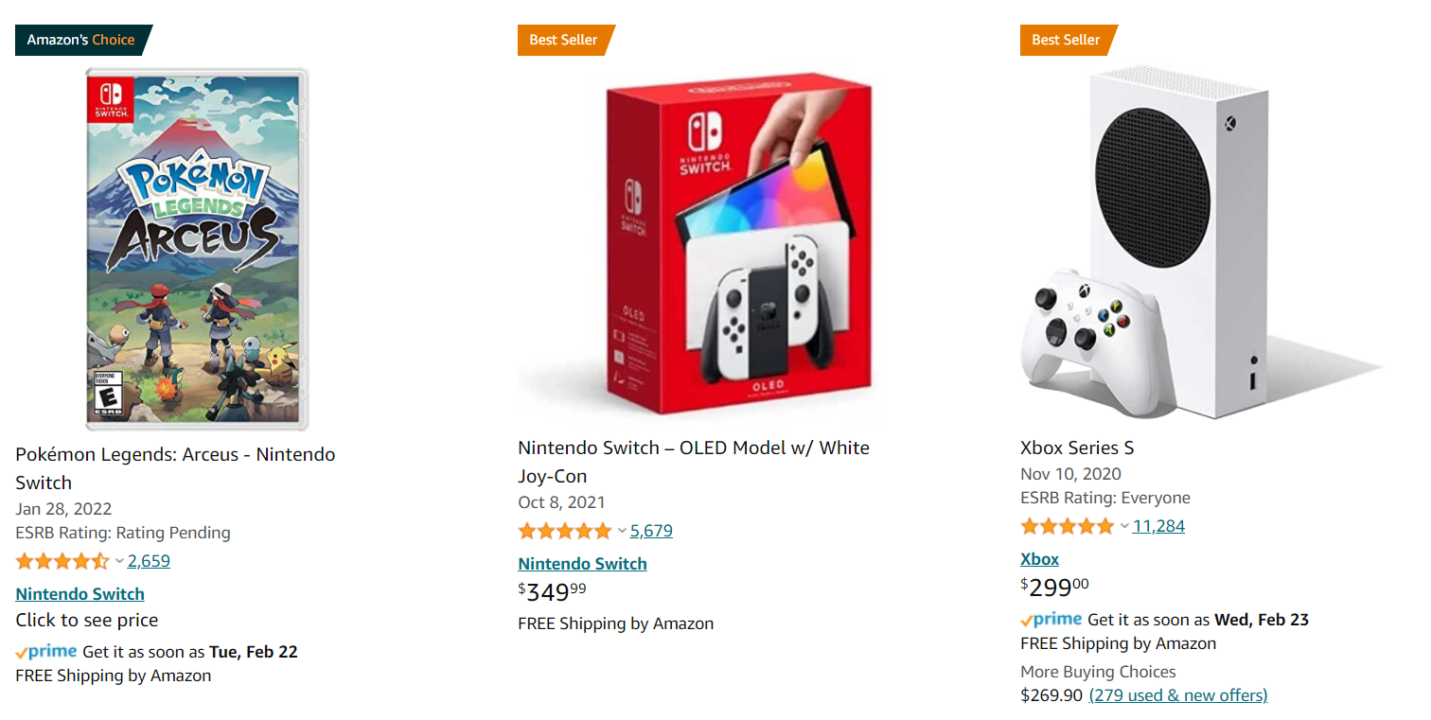
Fewer colors mean smaller file sizes. Preferably use a plain white background like the one used by Amazon. This helps achieve the objective without compromising image clarity.
Note how the below images on Amazon have transparent background. This reduces their size while maintaining the quality.
(Did you know that Omnisend offers a WooCommerce integration for marketing automation? You can connect your store here.)
Display many viewpoints for WooCommerce product images
Product images can positively or negatively impact your potential customers. You need them to captivate and convert your page visitors into buyers.
Therefore, it is important to show the product that customers are looking to buy from a holistic point of view.
This means creating WooCommerce product images that showcase the product from multiple viewpoints and angles.
These viewpoints are crucial since the customer can’t pick up and examine the products as they would in an offline store.
A holistic point of view is especially significant for items traditionally sold face-to-face like shoes, clothing, and foodstuffs.
Here’s an illustration:
How to change the product image in WooCommerce
It is quite essential to display multiple images of the same product in a user-friendly way to give the client a holistic view.
To add extra WooCommerce product images to your products that already have some images, open the product page in WordPress and add them.
If you have a huge collection of images for the same product, you can easily upload the whole catalog via CSV. WooCommerce has a built-in CSV importing feature.
Go to Products > All Products > Select your product > Add product gallery images
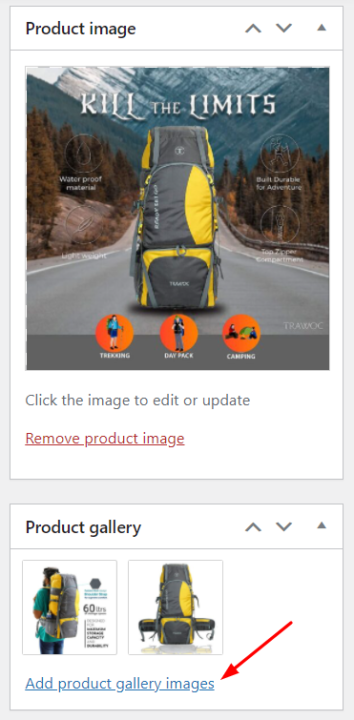
The CSV works in conjunction with a publicly accessible URL. An excellent choice is uploading them to Dropbox and copying the public address of the image file. Which you will then upload into your CSV.
The latest WooCommerce versions have a new feature that allows users to zoom an image on hover. It’s a great feature, especially if you’ve added higher definition images. It will help potential customers see the item on sale with finer details.
You could also give a 360º view of your product by leveraging a plugin like SR Product 360º View. This would give an even better product viewing experience.
Load speed optimization for WooCommerce product images
In a world where people are always pressed for time, it’s important to ensure that you deliver whatever the prospective customers want as early as possible.
Did you know that for every additional second your website takes to load, your conversion rate drops by 17%? This can have a drastic impact on your sales and revenue.
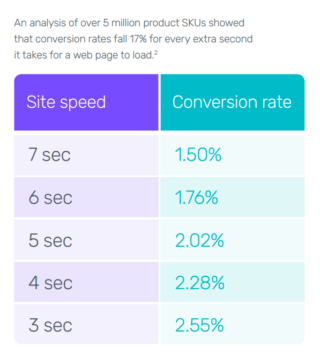
Images, being among the heaviest elements on a page, can play a major role in dictating the experience here.
That’s why it’s extremely important for you, as an ecommerce store owner, to learn how to optimize images to improve the loading speed of your site.
You do this by:
- Compressing images
- Converting images to a different format
- Setting up a content delivery network (CDN)
Let’s dig deeper.
Compress images
Compression is one of the best ways of optimizing images for your WooCommerce product gallery. It reduces the size of the images without necessarily altering their dimensions.
The two main types of compression include:
- Lossless compression: Reduces the file size of an image on a small scale so that the change in quality is not visible to the naked eye.
- Lossy compression: Reduces file size in huge chunks, which will sometimes change the quality of the image.
Often, you cannot tell the difference between lossless and lossy compression, especially if you’ve used a less aggressive algorithm when altering the image size.
You should use compression when editing your pictures to achieve the optimal WooCommerce shop page image size. It is an easy hack of reducing the image file size without changing anything else.
Quick Tip: Never upload images with huge file sizes because they will slow down your website and negatively affect your conversion rate. Compress the images using tools like JPEG Optimizer, TinyPNG, and Compressnow.
You can also use WordPress plugins to compress product images. These plugins can compress images while you’re uploading them to WordPress. This makes it convenient for you to compress images too.
Convert images to a different format
The loading speed of your ecommerce store largely depends on its weight and the size of image files uploaded. Converting the image into different file formats can play a major role in reducing your product image size. This, in turn, can speed up your website with ease.
The common formats used in online images include PNG and JPEG.
JPEG format is great for reducing WooCommerce image size because the images are smaller and easier to compress than PNG files. They also support lots of colors and are often used by big ecommerce stores like Walmart and Amazon.
However, JPEGs don’t support transparency. Hence, you might be forced to use PNG if you want to add transparency to your images.
Additionally, AVIF and WebP are the newest formats in town. They’ve become an instant sensation thanks to the great file size reduction they offer.
Surprisingly, they can reduce up to over half of your page weight without compromising on quality. This makes them perfect successors to the standard PNG and JPEG images.
What’s more?
You can easily integrate them into your WordPress and they’ll work seamlessly.
Configuring and using WebP is a walk in the park on WordPress. You can install a plugin like WebP Converter for Media. Once it’s installed, all you need to do is sit and relax.

The plugin works automatically, converting all the images on the website to WebP. This way, you receive new and lighter photos than the previous ones.
Set up a content delivery network (CDN)
CDNs are also known as content distribution networks. They are proxy servers in different geographical locations that act as intermediaries between the client requesting a resource and you, the provider.
They are internet servers distributed all over the globe by intermediary companies. As they’re nearer to the visitors than your server, they can speed up the delivery of your content and increase your page loading speed. Examples of these intermediaries include KeyCDN, MaxCDN, and Cloudflare.
CDNs help deliver media like videos and images to the client faster without overloading your server.
And guess what?
The best part about CDNs is that these intermediary server companies can handle multiple file requests in a matter of seconds. Within this timeframe, they deliver photos in your WooCommerce product gallery to the client using their robust network.
Acquire WooCommerce product image size mastery
Crisp, high-resolution WooCommerce product images are key to the success of every online store. Customers buy whatever impresses their sight.
Thus, it’s essential to learn how to optimize your WooCommerce product image size.
What’s more, you ask?
Clients love fast-loading sites and quick services as well. For this reason, you should also invest in platforms that can speed up your website and also automate marketing tasks.
Omnisend offers all marketing solutions under one roof. With Omnisend, you get;
- Detailed email analytics
- Abandoned cart email campaigns
- Customizable email templates
- Pop-ups for lead generation
- SMS campaign
- SMS regulation compliance, and more
So, start with Omnisend for free today!
Source link


