Welcome back, Tag Master. We hope you had a chance to catch part one of this two-part series on Google Tag Manager (GTM) optimizations, but if you missed it, go check it out here first and then come back. Don’t worry, I’ll wait.
So, that was a good day for the removal of tech debt and GTM container optimization. Words that I can tell just make the hairs stand up on the back of your neck.
The aim of this series is to inspire you with ways you can optimize your GTM containers by using less code. That’s right, less code. You might be wondering, is that even a problem? In our experience, yes, we see unnecessary code used all the time because people are often unaware of all the things GTM can do out of the box.
One reason is because GTM has added new features over the years, so some of these options may not have been available for you in the past or for your predecessor who you inherited your implementation from. We find that a lot of code nowadays can be replaced with safer and cleaner solutions using GTM’s often overlooked built-in features.
Using too much code can cause all sorts of problems, most often in the form of JavaScript errors that not only put your data quality at risk but also the functionality of your website.
Furthermore, it’s more difficult for you! You have to do more quality assurance (QA) than is really necessary, it’s harder for your colleagues or successors to understand, and you need to write more documentation.
We have a few more tips that will hopefully make your life easier, reduce risk, and streamline QA. Enjoy!
Stop Implementing Image Tags Using the Custom HTML Template
If you’ve read this heading and thought “But I don’t do that”, congratulations! This tip probably isn’t very useful, however, there are some people who do the unthinkable and paste image tags in the custom HTML tags. I know, it hurts me too.
If you’re still reading this tip then it’s likely you’ve done this. Don’t worry I’m not angry, just disappointed. Let’s get you up to speed.
I think the thing that throws most people off about image tags is when they need to fill in dynamic and custom parameters in the URL, so they head straight for the custom HTML tag because they know they can write custom logic in there and declare variables and build the URL dynamically.
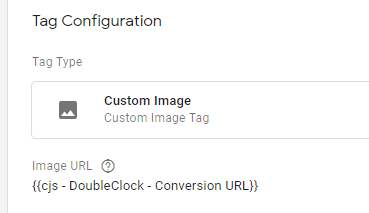
But the custom image tag is super easy to use and can do exactly this. At a basic level you can create your image tag and fill parameters with your GTM variables. Let’s take a look at an example for the up-and-coming Ad platform, DoubleClick:
![]() //doubleclick.net/pagead/viewthroughconversion/123451234/?containerTagId=39229&cid=1562537&type=424348&amount=0&event={{eventname}}&country={{Lookup – Country}}
//doubleclick.net/pagead/viewthroughconversion/123451234/?containerTagId=39229&cid=1562537&type=424348&amount=0&event={{eventname}}&country={{Lookup – Country}}
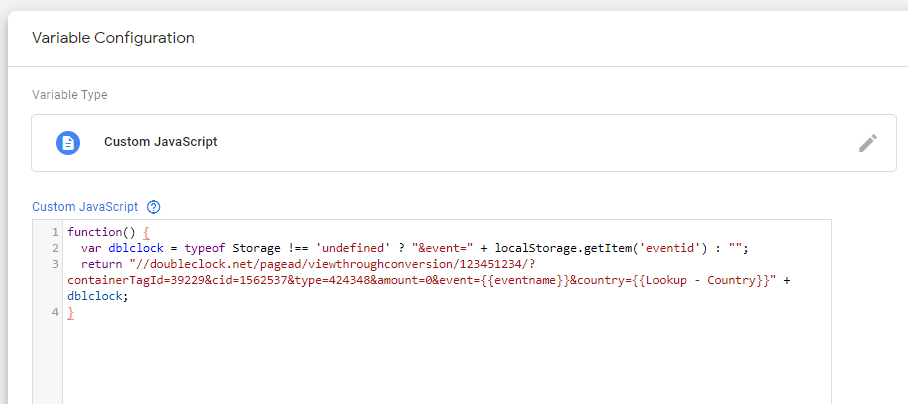
Furthermore, if you need to grab something from a cookie or local storage if it’s set on the fly, you could achieve this by even building the URL in a custom JavaScript variable and then adding it as a parameter to the Custom Image Tag. Let’s go back to DoubleClick for another example:

In the above example, I’m doing a check for an entry in localStorage and creating a parameter which is appended to the image URL. We could then use this in the Custom Image Tag to create our final URL.
This might not seem an advantage over using the Custom HTML tag, but it really is because Custom JavaScript Variables properly scope any variables that you might set and do a better job of handling errors.

Overall though, whenever you’re asked to implement an tag, you should always try to use the Custom Image Template rather than the Custom HTML Template.
Use DOM Elements Instead of Querying the Document in Custom JavaScript
When a teammate showed me this little trick, I was blown away. I’ve spent a chunk of my time in implementation scraping strings from the Document Object Model (DOM) for vendors or analytics using custom JavaScript, but GTM has a built-in, simple solution.
The variable type DOM Element can solve (most of) your woes when it comes to scraping data from the DOM. It can be a little finicky at times, but what isn’t when it comes to DOM scraping?
Here’s a good example of how we’ve scraped a unique ID off the page in the past when it’s not available in the data layer.
The biggest thing to note when using this method is that while the Attribute Name field can be left blank to capture the text of the DOM element, in my experience it’s been best to set the Attribute Name field to ‘content,’ which is usually an attribute.

Use Auto-Event Variables
Auto-Event Variables (AEVs) are one of the coolest features in GTM that I don’t hear enough people talking about.
Some of GTM’s popular built-in variables are themselves, auto-event variables. Things like:
- Click ID
- Click Element
- Click Classes
The AEV always provides you a value-based on the current target element – the element being clicked, for example. This is quite different from the DOM variable, which will provide you the value of a specific element on the page whether or not it’s being targeted by some user behavior.
The great thing is that you can define custom auto-event variables and grab custom parameters from elements being targeted. GTM provides you with the standard HTML attributes such as ID and Classes, but what if your developers have added data to the DOM using custom HTML attributes such as data-product-id or data-navigation?
Go ahead and create a new variable, choose the Auto-Event Variable template, change the variable type to Element Attribute, and then enter the name of the attribute you want to get:

I’ve seen this used when you need to get the product ID of a product being clicked and you don’t have that data available in the data layer. Obviously, this would be a last resort. You should try to get your developers to send a click event to the data layer for you with this data attached but, alas, life often isn’t that straightforward, and we have to do some ugly things.
Use JavaScript Variables to Get LocalStorage Items
Using variables kept in localStorage is a practice that’s often used to help keep some session data available for analytics when the data layer can’t do the job. These can be quite simple things at times: Has a user logged in? Has a cart been open already?
It’s acceptable to write a little JavaScript to get this information. In fact, most advice I see is to write a custom JavaScript variable to return this information, but the built-in GTM variable JavaScript variable can do the heavy lifting for us and save us a few lines of code.
Here’s a good example of taking the value from the localStorage item “cartOpened,” which reports true or false.

This could be used in conjunction with Adobe Analytics to work out when Open should fire, for example, or the same across a lot of different vendors.
If You’re Using Document.location, You’re Doing It Wrong
Document.location is a great tool to keep on hand. I’ve seen many people use it to capture parts of the URL or combinations that specific vendors or clients need for parameters, but there’s a cleaner, codeless method which you can utilize in GTM easily.

The URL variable breaks out all individual parts of the visible URL as well as Port. My advice is to create individual variables for each of these items and then create combinations of parts of the URL for easy use such as path + query string in a constant variable.
I suspect this tip isn’t going to blow your mind, but having this in a codeless and built-in variable is cleaner and saves the need for unnecessary custom JavaScript variables.
Start Optimizing your
And that’s it. We hope you enjoyed this little series on GTM optimizations and picked up at least one tip, something you didn’t know GTM could do that provides a simple, elegant solution to something you’d normally have written code for.
For those of us who enjoy writing code, I get it. Sometimes it’s easier and more fun to knock out a piece of code to do that job or spend some time learning how to solve that problem with code. In the long run, if you use all of GTM’s built-in features to your advantage, you’ll run into less errors, have to do less QA, and have a neater, tidier implementation that can be easily picked up by the unlucky (or lucky in this case) soul to inherit your implementation after you’re gone.
And for those who don’t like writing code or are maybe struggling with an inherited implementation that uses a lot of it, we really hope this helps you solve some of the data collection challenges you have in a simple way.
We’d love to hear about your experience implementing some of these features. Contact us to discuss your needs.
The post Top Google Tag Manager Optimization Tips appeared first on Blast Analytics.
Source link


